【Swiper】スクロールバーを実装する方法(外に出す方法も)
コードのこと
Swiperでスクロールバーを実装したい!
今回はSwiperで作ったスライダーにスクロールバーを実装する方法について解説します。
デフォルトのオプションを追加することで簡単に追加できますのでぜひ最後まで読んでWEBサイト制作に役立ててくださいね!
▼今回実装する基本のスライダー
今回は基本のスライダーと合わせて、スクロールバーが外にはみ出すような位置になるカスタマイズについても解説します。
もくじ
Swiperの基本導入方法
Swiperの基本的な導入方法は以下の記事にまとめています。
Swiperでスライダーをはじめて実装する方はまずは基本のコードからご確認ください。
Swiperのスクロールバーを有効にする基本設定
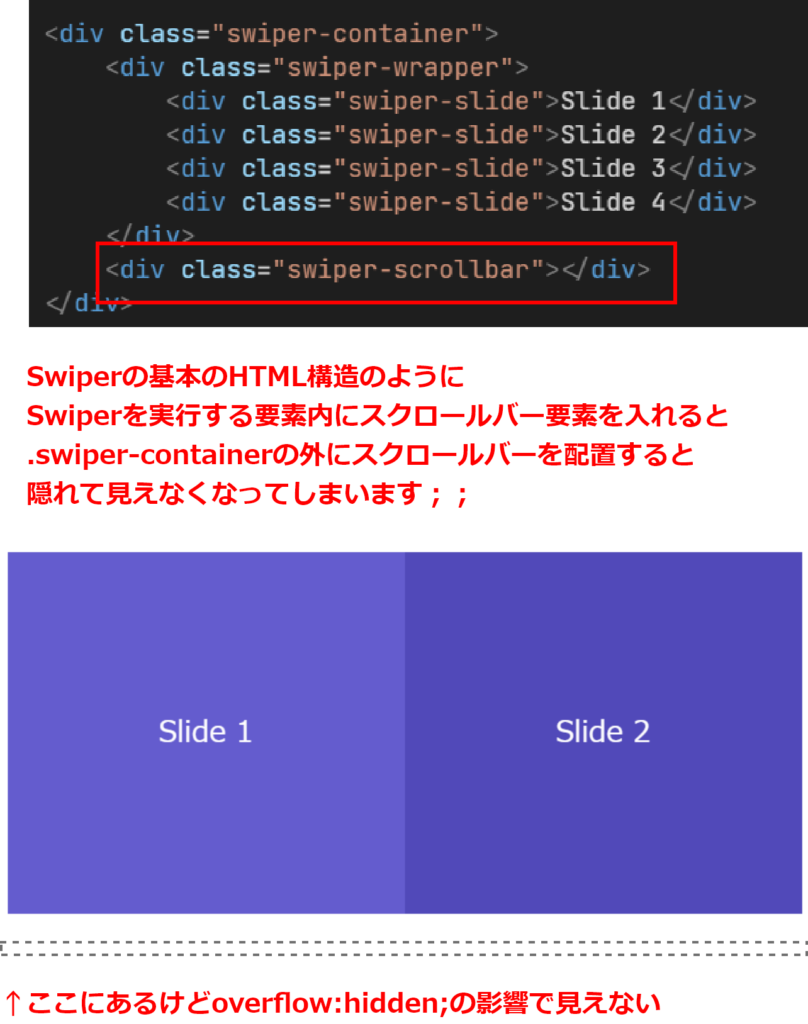
まずはHTMLでSwiperの構造を書きます。
HTML
<div class="swiper-container">
    <div class="swiper-wrapper">
        <div class="swiper-slide">Slide 1</div>
        <div class="swiper-slide">Slide 2</div>
        <div class="swiper-slide">Slide 3</div>
        <div class="swiper-slide">Slide 4</div>
    </div>
    <div class="swiper-scrollbar"></div>
</div>
次に、Swiperの初期化とスクロールバーを有効にするための基本設定を行います。JavaScriptを使ってSwiperを初期化しましょう。
JavaScript
<script>
    const swiper = new Swiper('.swiper-container', {
        slidesPerView: 2,
        scrollbar: {
            el: '.swiper-scrollbar',//.swiper-scrollbarをスクロールバーに指定
            hide: false,// スクロールバーが常に表示される
            draggable: true, // スクロールバーをドラッグ可能にする
        },
    });
</script>
これで、基本的なスクロールバー付きのSwiperが動作します。
draggable:trueにしないとスクロールバーはスライドの動きに連動して移動するだけになります。スクロールバーでスライド移動したい場合は忘れないようにしましょう!
Swiperのスクロールバーをカスタマイズ
次に、スクロールバーのスタイルをカスタマイズしていきます。CSSを使って、スクロールバーのデザインを調整しましょう。
CSS
.swiper-container {
    position: relative;
    width: 100%;
    margin: 0 auto 30px;
    height: 300px;
    overflow: hidden;
}
.swiper-scrollbar {
    background: #eee; /* スクロールバーの背景色 */
    height: 8px; /* スクロールバーの高さ */
    position: absolute;
    bottom: 10px; /* スライダーの下から10pxに配置 */
    left: 10px; /* 左から10pxに配置 */
    width: calc(100% - 20px); /* 左右の余白を考慮した幅 */
}
.swiper-scrollbar .swiper-scrollbar-drag {
    background: #ffa600; /* スクロールドラッグの色 */
    border-radius: 4px; /* 角を丸くする */
}
全体のコード
<!DOCTYPE html>
<html lang="ja">
<head>
    <meta charset="UTF-8">
    <meta name="viewport" content="width=device-width, initial-scale=1.0">
    <title>Swiper スクロールバー</title>
    <link rel="stylesheet" href="https://unpkg.com/swiper/swiper-bundle.min.css">
    <style>
        .swiper-container {
            width: 80%;/* スライドのスタイル */
            height: 300px;/* スライドのスタイル */
            margin: 0 auto 30px;/* スライドのスタイル */
            overflow-x: hidden;/* スライドのスタイル */
            position: relative;/* スクロールバーの位置調整 */
        }
        .swiper-slide {/* スライドのスタイル */
            display: flex;
            justify-content: center;
            align-items: center;
            font-size: 24px;
            color: #fff;
            background-color: #007aff;
        }
        .swiper-slide:first-of-type {/* スライドのスタイル */
            background-color: #645cce;
        }
        .swiper-slide:nth-of-type(2) {/* スライドのスタイル */
            background-color: #5149b9;
        }
        .swiper-slide:nth-of-type(3) {/* スライドのスタイル */
            background-color: #453daf;
        }
        .swiper-slide:last-of-type {/* スライドのスタイル */
            background-color: #3027a5;
        }
        .swiper-scrollbar {
            background: #eee; /* スクロールバーの背景色 */
            height: 8px; /* スクロールバーの高さ */
            position: absolute;
            bottom: 10px; /* スライダーの下から10pxに配置 */
            left: 10px; /* 左から10pxに配置 */
            width: calc(100% - 20px); /* 左右の余白を考慮した幅 */
        }
        .swiper-scrollbar .swiper-scrollbar-drag {
            background: #ffa600; /* スクロールドラッグの色 */
            border-radius: 4px; /* 角を丸くする */
        }
    </style>
</head>
<body>
    <div class="swiper-container">
        <div class="swiper-wrapper">
            <div class="swiper-slide">Slide 1</div>
            <div class="swiper-slide">Slide 2</div>
            <div class="swiper-slide">Slide 3</div>
            <div class="swiper-slide">Slide 4</div>
        </div>
        <div class="swiper-scrollbar"></div>
    </div>

    <script src="https://unpkg.com/swiper/swiper-bundle.min.js"></script>
    <script>
        const swiper = new Swiper('.swiper-container', {
            slidesPerView: 2,
            scrollbar: {
                el: '.swiper-scrollbar',
                hide: false,// スクロールバーが常に表示される
                draggable: true, // スクロールバーをドラッグ可能にする
            },
        });
    </script>
</body>
</html>
Swiperのスクロールバーをスライド内から外に出す
次はスクロールバーがスライドの下に来るようなスタイルに変更してみます。
▼実装例
Swiperでスクロールバーを使うには少しコツがあります。
重要なのはHTMLの構造とCSSです。実際のコードは以下です。
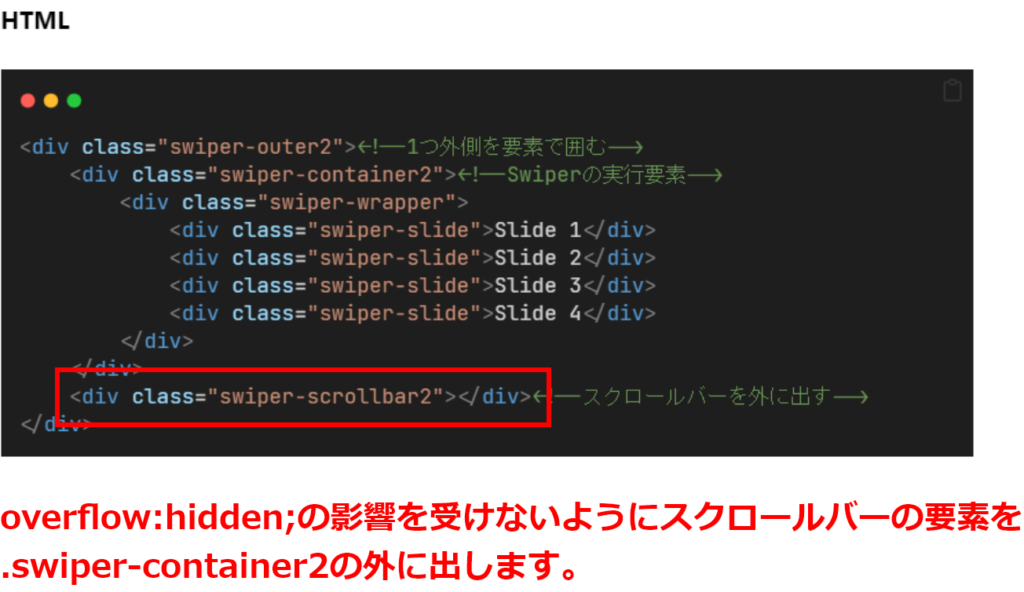
HTML
<div class="swiper-outer2"><!--1つ外側を要素で囲む-->
    <div class="swiper-container2"><!--Swiperの実行要素-->
        <div class="swiper-wrapper">
            <div class="swiper-slide">Slide 1</div>
            <div class="swiper-slide">Slide 2</div>
            <div class="swiper-slide">Slide 3</div>
            <div class="swiper-slide">Slide 4</div>
        </div>
    </div>
    <div class="swiper-scrollbar2"></div><!--スクロールバーを外に出す-->
</div>
スクロールバーとなる.swiper-scrollbar2を、Swiperを実行するswiper-container2の外に設置します。
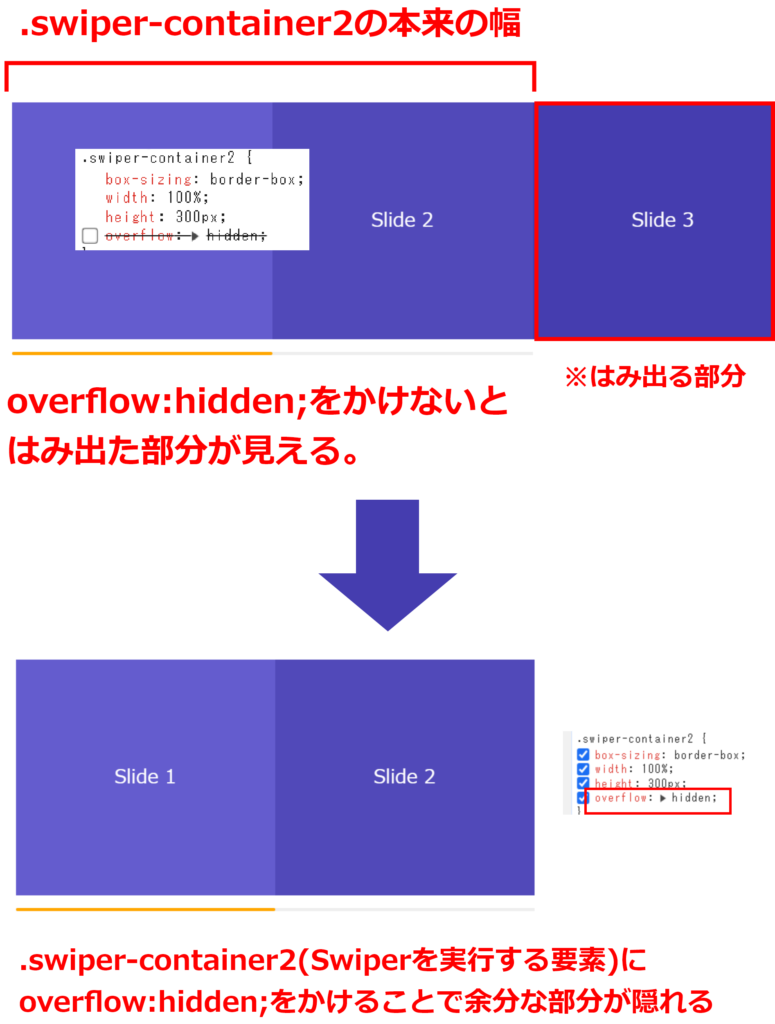
なぜかと言いますと、Swiperを実行するswiper-container2にははみ出た部分は隠すCSS「overflow:hidden;」を使用しなければならないことが多いからです!
Swiperはoverflow:hiddenをかけないと不要な部分が丸見えになってしまうのです!


このoverflow:hidden;の影響を考慮して、スクロールバーを外に出してHTMLを記述する必要があるのです。
JavaScript
const swiper2 = new Swiper('.swiper-container2', {
    slidesPerView: 2,
    scrollbar: {
        el: '.swiper-scrollbar2',//.swiper-scrollbar2をスクロールバーに指定
        hide: false,// スクロールバーが常に表示される
        draggable: true, // スクロールバーをドラッグ可能にする
    },
});
CSS
.swiper-outer2{
    position: relative;
    width: 100%;
    margin: 0 auto;
    padding-bottom: 30px;
}
.swiper-container2 {
    box-sizing: border-box;
    width: 100%;
    height: 300px;
    overflow: hidden;
}
.swiper-slide {
    display: flex;
    justify-content: center;
    align-items: center;
    font-size: 24px;
    color: #fff;
    background-color: #007aff;
}
.swiper-slide:first-of-type {
    background-color: #645cce;
}
.swiper-slide:nth-of-type(2) {
    background-color: #5149b9;
}
.swiper-slide:nth-of-type(3) {
    background-color: #453daf;
}
.swiper-slide:last-of-type {
    background-color: #3027a5;
}
.swiper-scrollbar2{
    background: #eee; /* スクロールバーの背景色 */
    height: 4px; /* スクロールバーの高さ */
    position: absolute;
    bottom: 10px; /* スライダーの下から10pxに配置 */
    left: 0; /* 左から10pxに配置 */
    width: 100%;
}
.swiper-scrollbar2 .swiper-scrollbar-drag {
    background: #ffa600;
    border-radius: 4px;
}
あとはCSSで位置調整を行うだけです♪
Swiperを複数設置するとスクロールバーがうまく動作しない?
ページ内にSwiperが複数ある時にスクロールバーがうまく動かないことがあります。
そんな時はそれぞれのスクロールバーの要素が同じクラスを使っていないか確認しましょう。
.swiper-containerのスクロールバーは.swiper-scrollbar、
.swiper-container2のスクロールバーは.swiper-scrollbar2という風になるように、
違うクラス名をつければしっかり動きます。
スクロールバーについつい同じクラス名を付けがちなので要チェックです!
Swiperのスクロールバーを実装する方法のまとめ
この記事のポイントをまとめます。
- HTMLにスクロールバーにしたい要素を配置&JavaScriptで指定してスクロールバーを実装します。
- スクロールバーをSwiperの実行要素の外に出したいときは、HTMLの記述でスクロールバーの要素をSwiperの実行要素の外に記述します。あとはCSSで位置調整します。
- Swiperを複数設置するとスクロールバーがうまく動作しない時はそれぞれのSwiperのスクロールバーの要素のクラス名が一緒でないか確認してください。
Swiperのスクロールバーはおしゃれなサイトで沢山使われていますのでぜひマスターしてくださいね!

